Test ETL
It’s always been a pain point to do ETL testing. But it more and more becomes a must after data being so widely used these days.
An ETL with more than 100 lines of code is common. The filter conditions, data transformation rules, join conditions and other logic there could be very complicated. In these cases, we should do a testing early to avoid possible production issues. Testing also gives us confidence about what we coded and helps team with quality assurance.
But there are a lot of challenges about ETL testing there, and we see a lot of team struggling.
ETL testing challenges
A common way to do ETL testing requires the steps below:
Create a production-like environment.
Copy the database definition and table schema to the environment.
For tables used in the ETL, we prepare testing data and insert data to tables.
We run the ETL and it generates a new table with data as a result.
We compare the generated data and the expected data to find if there are any issues.
There is no easy thing for the above steps.
For step 1, a production-like environment not only costs, but also requires heavy ops work. Cloud services may ease the ops work but you may be tightly bounded to some cloud.
For step 2, we may need to write scripts to sync database and table schema. We also need to develop a strategy to save the existing data in test environment. The drawback of it is that it breaks the network separation from test to production environment.
For step 3, it’s always been hard work to prepare testing data since some tables the ETL used may contain hundreds of columns and we have to pay attention to columns that are not used in the ETL. We also need to be careful about the column types and how the data is generated. And we need a script to insert data as well.
For step 4, we may need to maintain a separate configuration for testing environment.
For step 5, comparing data manually is tedious work and it’s easy to make mistake.
Some team relies on the statistics of the output table to identify issues of ETLs. It is a good practice. But when the logic becomes more and more complicated, it’s not enough to just rely on statistics, since there might be cases that are not covered even by the real data.
Testing ETL in Easy SQL
Easy SQL provides a very light-weight way to do ETL testing. It removes most of the blockers mentioned above.
To prepare a test in Easy SQL is easy. The first thing to do is to create a spreadsheet from the provided template.
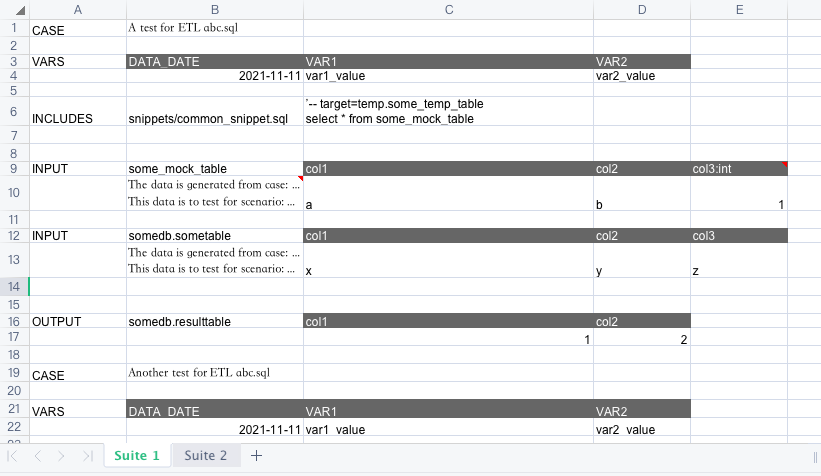
The template looks like below:
There are two concepts which are popular in testing domain. Easy SQL also adopted them:
Test case: A single test used to test your code in some specific scenario.
Test suite: A bundle of a few unit test cases. Could be used to run them together.
Test suite
In the screenshot above, we see two test suites, named ‘Suite 1’ and ‘Suite 2’. They are put in different sheets. In Easy SQL, if there is any sheet with a name starting with word ‘Suite’, the sheet is considered to be a test suite.
Test case
In test suite ‘Suite 1’, we can see two test cases. One case is ‘A test for ETL abc.sql’, and the other is ‘Another test for ETL abc.sql’. Test case is recognized by an uppercase keyword ‘CASE’ in column ‘A’. There should be a name of the test case in column ‘B’, and be next to the ‘CASE’ keyword.
To describe a test case, we usually specify the variables that should be used to run the ETL, the data of all input tables, the data of the output tables. They are recognized by keywords ‘VARS’ ‘INPUT’ ‘OUTPUT’ in column ‘A’ and values followed starting from column ‘B’ The data of output tables is used to test if output of the ETL after execution is exactly the same as the data specified in the test case.
Test case element format
The values of the mentioned elements in a test should be of formats below.
VARS: A table with header and exactly one row of data.
INPUT: A name of the input table specified at column ‘B’; A table with header and number of rows of data starting from column ‘C’ of the same row; Mandatory descriptions of each row of data at column ‘B’ starting from the next row.
OUTPUT: The same format with ‘INPUT’, except that the descriptions of each row of data is optional.
You may ask why the descriptions of each row of data in ‘INPUT’ table is mandatory. This is a design on purpose. It is designed to improve test readability. The test case designer could record how the data is generated to explain the business rules behind the data and what is the scenario that the data is designed to cover.
For input tables and output tables, we may need to specify the type of each column. If so, we need to add type to the column names in format ‘{COLUMN_NAME}:{TYPE}’. If there is any column of a table with type specified, the type of other columns should be specified as well. If the type of any other column is not specified, it will be default to ‘string’ type.
Column types
The type of column varies for different backends.
For Spark, it should be ‘int’ ‘bigint’ ‘boolean’ ‘string’ and so on. The full list of types with built-in support are: ‘int’ ‘tinyint’ ‘bigint’ ‘double’ ‘float’ ‘string’ ‘decimal’ ‘boolean’ ‘date’ ‘timestamp’ ‘array<string>’ ‘array<int>’ ‘array<tinyint>’ ‘array<bigint>’ ‘array<double>’ ‘array<float>’ ‘array<boolean>’ ‘array<date>’ ‘array<timestamp>’.
For Postgres, it should be ‘int’ ‘bigint’ ‘boolean’ ‘text’ and so on. The full list of types could be found here. The default type is ‘text’.
For Clickhouse, it should be ‘Int8’ ‘Boolean’ ‘String’ and so on. The full list of types could be found here.
For the other backends, please refer the database data types related document of it.
Mock includes
If we have used include command in our ETL and we’d like to mock the body of the included file. We can add a INCLUDES section in the test case.
Then provide the mocked body of the ETL follow the rules below:
Column ‘B’ at the same row of the INCLUDES keyword should be filled with the file path of the include command in ETL.
Column ‘C’ at the same row of the INCLUDES keyword should be filled with the mocked body of the included file.
Add another row to specify a second INCLUDE to mock, with column ‘B’ and ‘C’ filled with file path and the mocked file body.
Usually, the included ETL file returns some temporary table. In this case, we can mock the content of the included file as below:
-- target=temp.THE_RETURNED_TEMP_TABLE
select * from some_mocked_data
After this, we need to add an input table and provide the mocked data. The way to achieve this is the same as to define a normal input table above.
Test file name
We recommend to create one test file for one ETL. It means all the test cases in one spreadsheet file should be testing the same ETL.
In this case, the file name of the test file and the testing ETL could follow some convention so that we can find the ETL file given the test file.
Easy SQL provides a way to find ETL file from the test file automatically, which follows a simple convention that the base name of the ETL file and that of the test file should be the same. E.g. when the ETL file is named ‘some_etl.sql’, then the test file should be named ‘some_etl.xlsx’.
We also recommend there is only one OUTPUT table in one ETL. In this case, the name of the ETL could be the full table name of the output table. E.g. when an ETL output a table named ‘some_db.some_table’, the file name of the ETL should be ‘some_db.some_table.sql’ and the test file name of the ETL should be ‘some_db.some_table.xlsx’.
Add test files to version control system
The test file mentioned above is a spreadsheet file. It is in binary format and not so easy to be added to version control system.
Easy SQL provides a way to dump a test in spreadsheet format to JSON format. After this, we can add the JSON file to version control system. In this way, we can easily compare the changes of each version about this cases.
The JSON file is also optimized to let us compare data changes easily.
To convert a test file in spreadsheet format to JSON format. Run the command below:
(Before you run the command below, you will need to install two additional packages by pip3 install click==6.7 pymongo==3.10.1 openpyxl==3.0.10)
python3 -m easy_sql.sql_test convert-json -f {YOUR_XLSX_FILE_PATH}
After the command finishes, there will be a JSON file with the same name but a ‘.json’ suffix of the spreadsheet file generated. The directory of the JSON file is the same as the spreadsheet file.
Run test
Easy SQL provides a command line module to help to run ETL tests.
To run the ETL test, execute the command below:
(Before you run the command below, you will need to install two additional packages by pip3 install click==6.7 pymongo==3.10.1 openpyxl==3.0.10)
python3 -m easy_sql.sql_test run-test -f {YOUR_XLSX_FILE_PATH} -b {BACKEND}
The test file could be a JSON test file as well. And the backend could be one of the supported backend.
For details of the command line usage, please run python3 -m easy_sql.sql_test --help.
Run test programmatically
Easy SQL also provides an interface to run ETL programmatically. This way, you can easily integrate tests in Easy SQL with your favorite testing framework.
To run a test in your code, write code below:
import os
from easy_sql.sql_tester import SqlTester
from easy_sql.sql_processor.backend import SparkBackend
from pyspark.sql import SparkSession

SqlTester(env='test',
          backend_creator=lambda case: SparkBackend(SparkSession.builder.enableHiveSupport().getOrCreate()),
          work_dir=os.path.abspath(os.curdir))
    .run_tests('path/to/your/test/file')
For a concrete example, please refer to code here.